Sunday 28 July 2013

Microdermal Removal

I am absolutely in love with microdermals. I have had three so far, one on my throat area and two on the back of my neck in a vertical fashion. I've found these piercings to be the easiest ones to heal besides my tongue piercing. Unfortunately, I knocked my throat microdermal on Saturday night and had to sadly resort to removing the thing myself.

I had the microdermal implanted in January of this year just to give a time frame.

Here is a picture of my throat taken earlier tonight. The area surrounding the microdermal had become red and stung quite a bit, appearing to be slightly bruised and looking like a rash. The foot or base of the microdermal was actually poking up out of the skin, so the microdermal was diagonally facing downwards :( 

I used a few things to pull the microdermal out of my throat... I guess here is a DIY of sorts to help if you absolutely need it taken out and cannot get to a shop. I want to stress that I am NOT a licensed piercer-I simply had to take it out since piercings shops here are not open on Sundays or Mondays ;/


VISIT A PIERCER TO HAVE IT REMOVED PROPERLY. 

You'll Need: 
-Savlon (or antiseptic spray)
-Tweezers
-Cotton pads
-Gauze + tape
You have to understand that removing your microdermal will not be fun. I've heard of some just popping out, but it depends on the level of rejection your microdermal is at. I still had all three circles connected with skin to my actual skin-making it difficult to pull out with tweezers.

1. Sterilize everything. Don't use cotton pads that have been laying around, try to use ones from the package and wipe everything off using a clean cloth or paper towel. Wash and sterilize tweezers and consider using gloves or washing hands several times before starting.

2. Massage the skin around the piercing, gently pushing the microdermal base in the direction it is already rejecting. Since my rejecting microdermal was facing upwards I pushed the base section still submerged in my skin upwards. I did this to mainly ease the piercing naturally out of my skin and to also make my skin more "loose" in that area. Consider massaging the area in the shower or running warm water over the area in a gentle stream or by patting with a cloth if alternative method is desired.

3. I grabbed my tweezers which I properly sterilized and began to slowly tug at the piercing. The sensation is that similar to when you have the piercing put in-it feels like a sort of light burning feeling with a little bit of stinging tenderness.

4. I really began alternating between massaging the skin, pushing the base upwards and lightly pulling the microdermal with my tweezers at this point. I did give it a little tug eventually and the jewellery actually just popped out. The total process probably took me an hour or so, so don't feel like because the jewellery hasn't popped out in ten minutes you're doing something wrong.

5. Apply pressure with cotton pads to the area, making sure to clean up blood if any is present.

6. Gently wash the area and dry with paper towel by dabbing the exposed wound.

7. Spray once with Savlon spray (careful might sting) 

8. Bandage with gauze and leave the area ALONE.

Once you're done being bandaged up like me, take care of your new wound appropriately, and perhaps mourn the loss of your beautiful piercing :(


Saturday 13 July 2013

Cheesy Bacon(optional) Potato Side Dish

Fiancé and I got a little hungry so for dinner I made a vegetarian (meat for me) potato dish that was entirely cooked on the stove top :) So excited to get a kitchen again once we're back in the UK. But anyways, recipe for now......


Ingredients:
  • Sliced (thinly) potatoes 
  • Cooking oil/cooking spray for heating pan
  • 1 red pepper
  • 1/2 onion 
  • 1 clove of garlic 
  • 3/4 cup sliced (thinly) mushrooms 
  • Salt 
  • Rosemary, Oregano, Thyme and Basil spice mix
  • 1 cup cheese (optional) 


Preheat stove top with a giant pan (we used a wok) using oil or cooking spray on low-medium heat, enough to cook through your potatoes. We purchased pre-peeled and pre-cooked potatoes that needed reheating but feel free to use your own for this section. Cook potatoes in giant pan on medium-low or however you would like to cook thoroughly. 


 Dice up 1 clove of garlic very finely and into small pieces. Cut onion into similar thin chunks and proceed to slice up mushrooms and peppers (preferably cube shaped).


Once potatoes have cooked fully, add garlic and onion into the pan and stir in well, allowing to rest and seep flavour into potatoes. Let sit for 5 minutes on low simmer. Next, add in peppers and mushrooms and additional veg to the pan and mix in well, heating pan enough for peppers to become soft (cooked) and mushrooms to turn a darker brown colour. 


Once everything is in the pan, add a liberal amount of salt to taste and a mixed spice bag I've made and will possibly explain what I did to make it into your mixture. The mix includes about a pinch of basil, thyme, rosemary and oregano. You can add a pinch of each separate if you don't feel like making a bag of spices!


Next, I heated up a separate pan and cooked some bacon that I wanted to add to my plate. My Fiancé and I obviously have different dietary restrictions (him being a veg) so I often split the meal and add things for him or myself according to how we feel.


 After frying the bacon to a nice crispy texture, I dried off the excess grease with a paper towel and broke up the bacon with my hands, adding it to my separate heated pan for my non veggie meal. The veggie alternative is already done at this point, however, cheese can be sprinkled lightly on top to add something extra. I then stirred everything together, tasting once again and re-spicing and plated.

Here's a photo of him way too excited to have food made twice in one day ;) 


Tuna "Stove Top" Casserole

Soo I have absolutely no idea how to start one of these blog things. I'm really just a semi-broke student from Canada who likes to smoke pot and get naked. I'm a pretty easy going person and decided to create this food blog to help other foodies, bakers and smokers with delicious recipes that are easy and quick to make. I also have an interest in "curing your munchies", hence the title. :) 


I've been in Amsterdam for the past month and one thing I've been stuck with this entire time is a stove top. No oven, no toaster, no microwave, no grill....literally just a stove top. Which at first probably doesn't seem that bad but as a smoker it makes it really pricey and quite annoying to have to run to the store everyday and dish out 3.00 EUROS for a box of Oreo cookies my fiancé and I will surely get through within 10 minutes. The benefits however are learning how to use alternative methods to cook things and make them taste like slow cooker meals minus the time and the proper equipment (but I'm still missing my damn oven).

I've been making these casseroles the past few days since you can do them on your stove top entirely and they taste like the tuna casseroles my mom used to make for us as a kid. :)
Removing the tuna will make it veggie friendly!
INGREDIENTS:
All ingredients should be altered to your liking. If you like carrots add more of them :P 
  • 1 cup carrots
  • 1/2 can of tuna (optional)
  • 2 green onion stalks
  • 1/2 block of diced tofu 
  • Fusili pasta (however much)
  • Grated cheese (any type)
  • Salt 
  • Paprika
  • Oregano
  • Basil, Rosemary, Oregano, Thyme mix 
  • Oil for frying

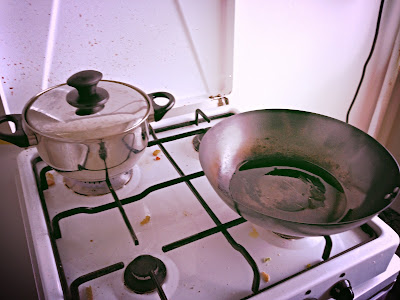
 To start, boil water in a pot for the carrots and use a non stick spray or cooking oil to lightly glaze another pan. Let the large pan heat up on a low-medium setting so your tofu does not burn when you throw it onto the pan. Also, ignore my dirty stove, cooking high gets messy :(

Once the pot has heated up, add your carrots to the pot and let boil until a soft texture is achieved.


 While your carrots are boiling, dice up your tofu and green onions and add them to your oiled pan. You can choose to throw your green onions into the pan at this time with your tofu or wait until after you have added your pasta to the mixture so they don't burn!


After throwing together your green onions and tofu, cook tofu until golden brown or to suit your liking.


 Next I took my boiled carrots, diced them and added them to my pan with the tofu and green onions. To season the mixture, I added salt to taste, two pinches of paprika, one pinch of oregano and one pinch of my spice blend mix.


Boil another pot of water for your noodles. Once boiled, add as many fusili noodles as you desire while continuing to cook your pan veggie mixture on LOW heat (essentially a simmer). Once your pasta has boiled, drain it and add it to your previous mixture, stirring together your carrots and other vegg with the pasta. Spice again and taste, adding more salt and paprika especially.
*Don't worry if you just taste the paprika spice now, the tuna and cheese will mask some of the strong taste!


This is where my photos might get a little weird. My fiancé is a vegetarian but I am not, so I divided the pan of pasta and veggies into two pans and kept both of them on low heat. The veggie pan is done now, the only ingredient left to add is cheese. The TUNA CASSEROLE needs tuna :P Add half a can of tuna (preference) to your mix and stir in well. Taste here to see if spices are correct.

Once mixing in your tuna, grab your cheese, however much you want keeping in mind the mixture will be melted and thrown together and add a relatively thin layer over the two still heated pans. Keep the temperatures at a medium-low, making sure not to burn your pasta. To melt cheese properly, spread out your pasta and veg evenly and thinly across the pan before sprinkling cheese on top. This distributes the cheese evenly.


Once melted, scoop and serve!